

Add CarPlay to your Flutter App 🚗
A guide on how to integrate Apple CarPlay support into your Flutter Application


What is Apple CarPlay?
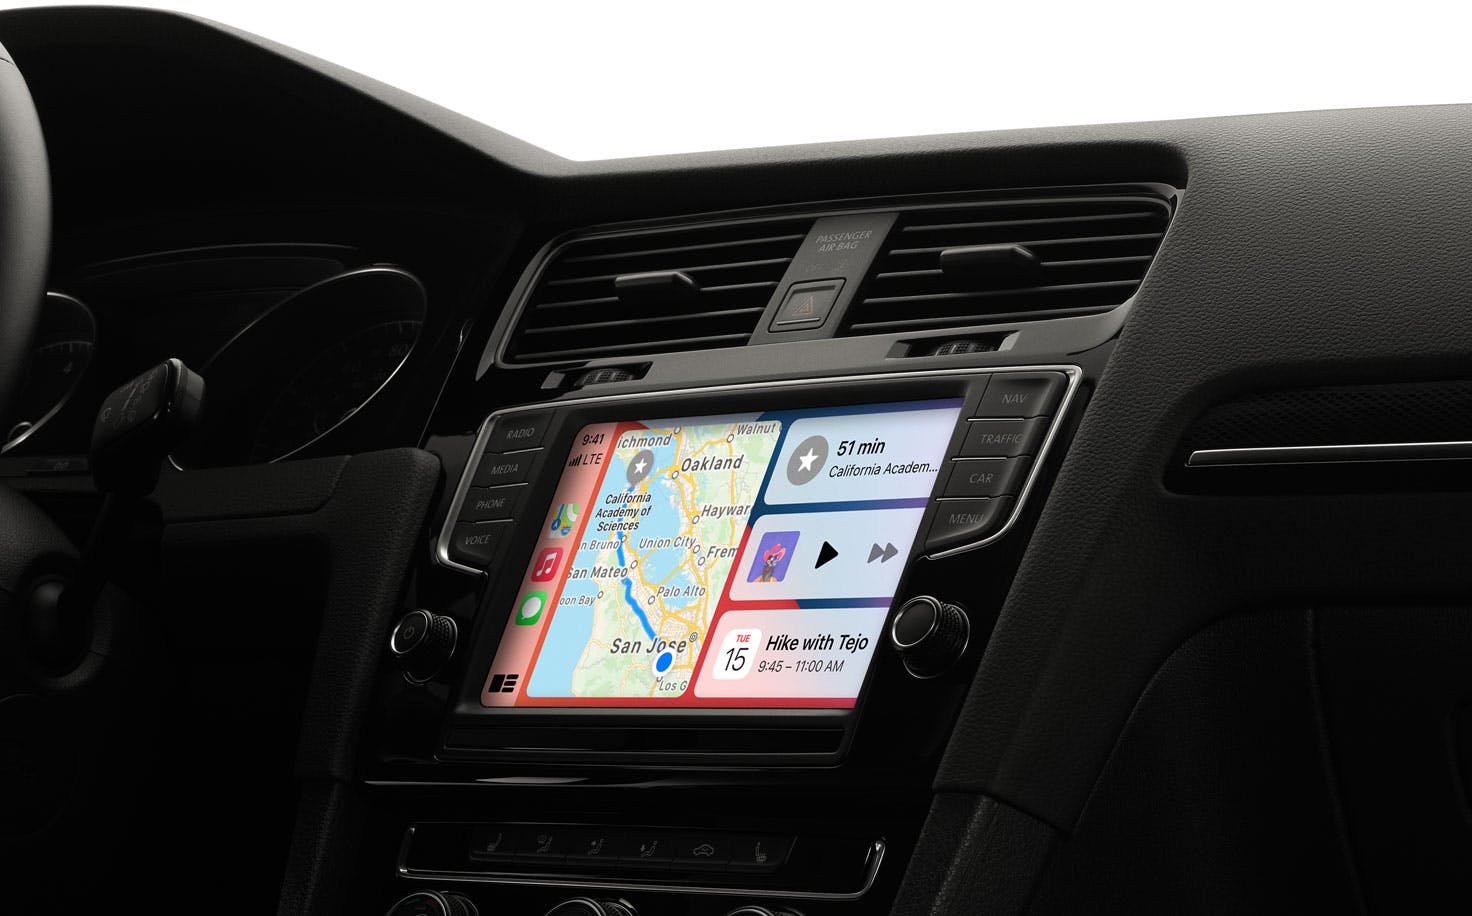
CarPlay is an Apple iOS Car Integration Standard that allows you to connect your iPhone to your car's infotainment system and display a simplified iOS-like interface. This gives you access to specific apps for use in your vehicle. CarPlay makes really good use of Siri, allowing you to issue commands and listen to music while driving.
Apple CarPlay is now almost a standard feature in most of our automobiles. While most modern cars already have some sort of "smart" interface, it is usually pretty bad. They're frequently complicated, have poor voice assistants, and make it difficult to use apps on your phone. CarPlay works consistently in any vehicle that supports it, providing iPhone users with a familiar interface.
With almost every major car manufacturer currently supports/planning to support Apple CarPlay, making the most of an in-car presence will become a must-have for many apps. You can check the whole automobile manufacturer list from Apple. To understand better, The official App Programming Guidelines from Apple is the most valuable resource for understanding the needs, limits, templates, and capabilities of CarPlay Apps. This documentation is a 49-page which clearly spells out some actions required, and you are strongly advised to read it.
Apple's core iOS applications Music, Messages, Calendar, Maps, Podcasts, and News already support CarPlay, and an increasing number of 3rd-party products are joining them such as Spotify and Waze. If you are interested in this system, MFi Program is an excellent starting point.
Adding CarPlay support to your application will help it more to catch attention and stand out from other applications that do not support CarPlay. It is being integrated by an increasing number of car manufacturers and has been to market faster than Android Auto. With each release, Apple adds more functionality and application types to CarPlay, making now a better time than ever to consider adding support to your application.
How it works?
Apple announced some great features in iOS 14, one of which users download CarPlay applications from the App Store and use them on iPhone just like any other app. When an iPhone app is connected to a CarPlay vehicle, the app icon appears on the CarPlay home screen. CarPlay apps are not separate apps — you add CarPlay support to an existing app. Your app uses the CarPlay framework in order to provide already-designed templates and UI components to the user. Basically, CarPlay takes the things you want to do while driving and puts them on the car’s built-in display. iOS controls the presentation of UI components as well as the interaction with the vehicles. Your program does not need to handle UI element layout for multiple screen resolutions or support varied input hardware like touchscreens, knobs, or touchpads. For general design guidance, see Human Interface Guidelines for CarPlay Apps.
CarPlay with Flutter
You heard right, Flutter Apps are finally compatible with Apple CarPlay after 2.5 years! In pub.dev, there is a package named flutter_carplay which is making great progress in this area and provides a series of templates that the developer can use to display application data in the integrated car's system, in addition, you can even communicate with the iPhone app. Here is the GitHub repository of the package.
Getting started requires some native code, but after that, everything will be done on the Flutter side. The README file in the package contains up-to-date detailed instructions for these steps.

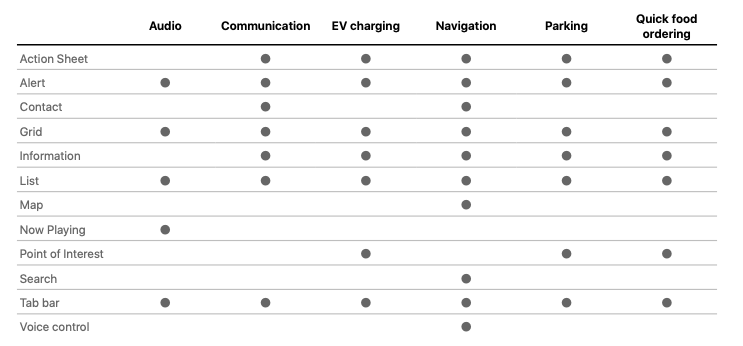
Templates
CarPlay apps are built from a fixed set of user interface templates that are rendered on the CarPlay screen by iOS. Each CarPlay app category is limited to a certain number of templates. Your access to templates is determined by your app entitlement. You must choose the most appropriate category from the list below and contact Apple to request entitlement permission.
If you are not sure, take a look at the templates' pictures of the CarPlay in the README file here.
All CarPlay apps require a CarPlay app entitlement
If you want to publish your app to the App Store with Apple CarPlay compatibility, or if you want to test or share your app with others via Testflight or AdHoc, you must first request that Apple approve your Developer account for CarPlay access. The process can take anywhere from a few days to several weeks or even months. It is determined by the type of Entitlement requested.
To request a CarPlay app entitlement from Apple, go to Apple CarPlay Contact Page and provide information about your app, including the CarPlay App Category. Also, you have to agree to the CarPlay Entitlement Addendum.
During development, you can use the built-in CarPlay simulator. The latest iOS 14 simulator appears to be fully functional and functions nearly identically to a physical CarPlay unit.
Whether you are running the app through a simulator or creating it for release, you must add the appropriate entitlement key to the Entitlements.plist file. If you do not already have an Entitlements.plist file, you must create one.
If you already received the entitlements from Apple, start configuring your CarPlay app with the entitlements. You need to create and import the CarPlay Provisioning Profile and add an Entitlements File to Xcode Project. For more detailed instructions, visit Import the CarPlay Provisioning Profile in Apple Developer Documentation.
Before The Installation
You are about to make some minor changes to your Xcode project after installing this package. This is due to a binary messenger and the fact that it requires bitcode compilation which is missing in Flutter. You will procedure that will relocate (we won't remove or edit) some Flutter and its package engines. If you're planning to add this package to a critical project for you, you should proceed cautiously. For more details, see the most recent updates from the README file of the package.
Please check the example project before you begin the installation.
Instructions after installing the package
- The iOS platform version must be set to 14.0. To make it global, navigate to
ios/Podfileand change the following code to (If there is an#, remove it):
platform :ios, '14.0'
After changing the platform version, execute the following command in your terminal by going to ios/ folder to update your pod files:
// For Apple Silicon M1 chips:
$ arch -x86_64 pod install --repo-update

// For Intel chips:
$ pod install --repo-update
- Open
ios/Runner.xcworkspacein Xcode. In your project navigator, openAppDelegate.swift.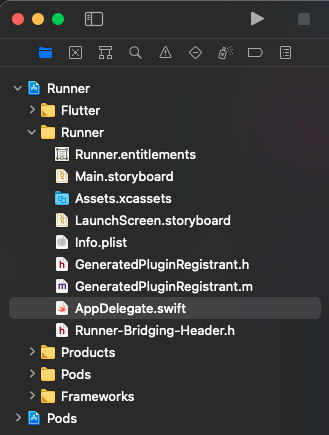
Remove the following codes:
GeneratedPluginRegistrant.register(with: self)
return super.application(application, didFinishLaunchingWithOptions: launchOptions)
After that, it should look like (if there is no third-party extension in your code):
import UIKit
import Flutter

@UIApplicationMain
@objc class AppDelegate: FlutterAppDelegate {
    override func application( _ application: UIApplication,
                               didFinishLaunchingWithOptions launchOptions: [UIApplication.LaunchOptionsKey: Any]?) -> Bool {
        return true;
    }
}
Create a swift file named
SceneDelegate.swiftin the Runner folder (not in the Xcode main project file) and add the code below:@available(iOS 13.0, *) class SceneDelegate: UIResponder, UIWindowSceneDelegate { var window: UIWindow? func scene(_ scene: UIScene, willConnectTo session: UISceneSession, options connectionOptions: UIScene.ConnectionOptions) { guard let windowScene = scene as? UIWindowScene else { return } window = UIWindow(windowScene: windowScene) let flutterEngine = FlutterEngine(name: "SceneDelegateEngine") flutterEngine.run() GeneratedPluginRegistrant.register(with: flutterEngine) let controller = FlutterViewController.init(engine: flutterEngine, nibName: nil, bundle: nil) window?.rootViewController = controller window?.makeKeyAndVisible() } }
One more step, add these keys with the values to your
Info.plistfile:<key>UIApplicationSceneManifest</key> <dict> <key>UIApplicationSupportsMultipleScenes</key> <true /> <key>UISceneConfigurations</key> <dict> <key>CPTemplateApplicationSceneSessionRoleApplication</key> <array> <dict> <key>UISceneConfigurationName</key> <string>CarPlay Configuration</string> <key>UISceneDelegateClassName</key> <string>flutter_carplay.FlutterCarPlaySceneDelegate</string> </dict> </array> <key>UIWindowSceneSessionRoleApplication</key> <array> <dict> <key>UISceneConfigurationName</key> <string>Default Configuration</string> <key>UISceneDelegateClassName</key> <string>$(PRODUCT_MODULE_NAME).SceneDelegate</string> <key>UISceneStoryboardFile</key> <string>Main</string> </dict> </array> </dict> </dict>
That was all you need to do, and now you are ready to build your first CarPlay app with Flutter! 🚀😎
You can find a lot of detailed usages and features that the package provides, in the README file here. All functions and static usages are thoroughly described.
Adding a template
Let's start by adding a simple CarPlay menu to a Flutter application. You must always have a root template when working with the CarPlay display stack. Depending on the type of application, this is the base template that sits at the bottom of the display stack.
Initializing the flutter carplay and adding a tab bar template:
import 'package:flutter/material.dart';
import 'package:flutter_carplay/flutter_carplay.dart';

void main() {
  runApp(const MyApp());
}

class MyApp extends StatefulWidget {
  const MyApp({Key? key}) : super(key: key);

  @override
  State<MyApp> createState() => _MyAppState();
}

class _MyAppState extends State<MyApp> {
  final FlutterCarplay _flutterCarplay = FlutterCarplay();

  @override
  void initState() {
    super.initState();

    FlutterCarplay.setRootTemplate(
      rootTemplate: CPTabBarTemplate(
        templates: [
          CPListTemplate(
            sections: [
              CPListSection(
                items: [
                  CPListItem(
                    text: "Item 1",
                    detailText: "Detail Text",
                    onPress: (complete, self) {
                      self.setDetailText("You can change the detail text.. 🚀");
                      complete();
                    },
                    image: 'images/logo_flutter_1080px_clr.png',
                  ),
                  CPListItem(
                    text: "Item 2",
                    detailText: "Start progress bar",
                    isPlaying: false,
                    playbackProgress: 0,
                    image: 'images/logo_flutter_1080px_clr.png',
                    onPress: (complete, self) {
                      complete();
                    },
                  ),
                ],
                header: "First Section",
              ),
            ],
            title: "Home",
            showsTabBadge: false,
            systemIcon: "house.fill",
          ),
          CPListTemplate(
            sections: [],
            title: "Settings",
            emptyViewTitleVariants: ["Settings"],
            emptyViewSubtitleVariants: [
              "No settings have been added here yet. You can start adding right away"
            ],
            showsTabBadge: false,
            systemIcon: "gear",
          ),
        ],
      ),
      animated: true,
    );
  }

  @override
  Widget build(BuildContext context) {
    return MaterialApp(
      home: Scaffold(
        appBar: AppBar(
          title: const Text('Flutter Carplay'),
        ),
        body: Text('CarPlay with Flutter'),
      ),
    );
  }
}
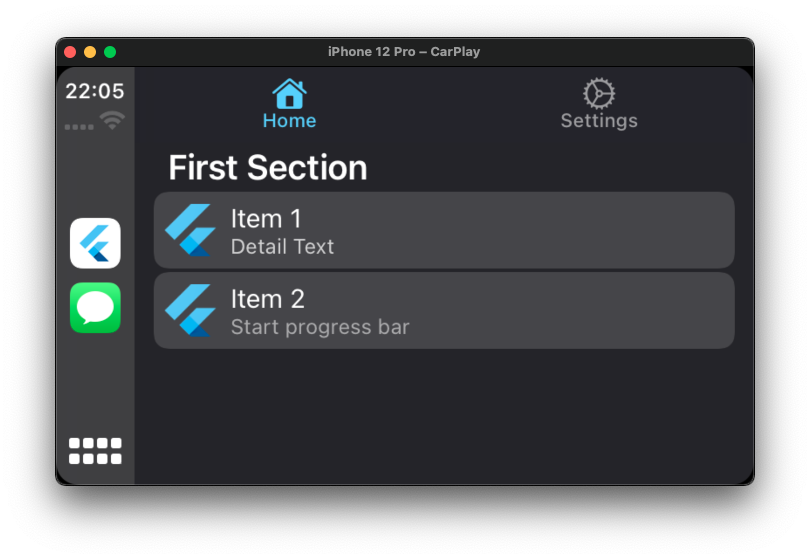
As you can see, we've made a newCPTabBarTemplate called FlutterCarplay.setRootTemplate within theinitState. This ensures that the templates obtained show before the app is initialized. You can initialize on any screen or in any function you want, but if the carplay app launches before the mobile app sets the root template, the carplay app will crash automatically. Crashing has a negative impact on users and may make them dislike the app, we do not want this to happen to your users at any time.
A root template is required to be one of the types: CPTabBarTemplate, CPGridTemplate or CPListTemplate. Otherwise, it will throw a TypeError.
Additionally, you can find Tab bar, Grid, Alert, Action sheet and List templates. In the next releases of the plugin, other templates such as map, search, and voice control will be supported. You can find the most recent road map here. Also, if you are interested in contributing, contributors are always welcome, for more detail please visit here.
Show a new template by adding to the CarPlay navigation hierarchy
You can only push a new template which is CPGridTemplate or CPListTemplate. If you try to show an alert or modal, a type error will have occurred.
FlutterCarplay.push(
  template: CPGridTemplate(
      title: "Grid Template",
      buttons: [
        for (var i = 1; i < 9; i++)
          CPGridButton(
            titleVariants: ["Item $i"],
            image: 'images/logo_flutter_1080px_clr.png',
            onPress: () {
              print("Grid Button $i pressed");
            },
          ),
      ],
    ),
  animated: true,
);
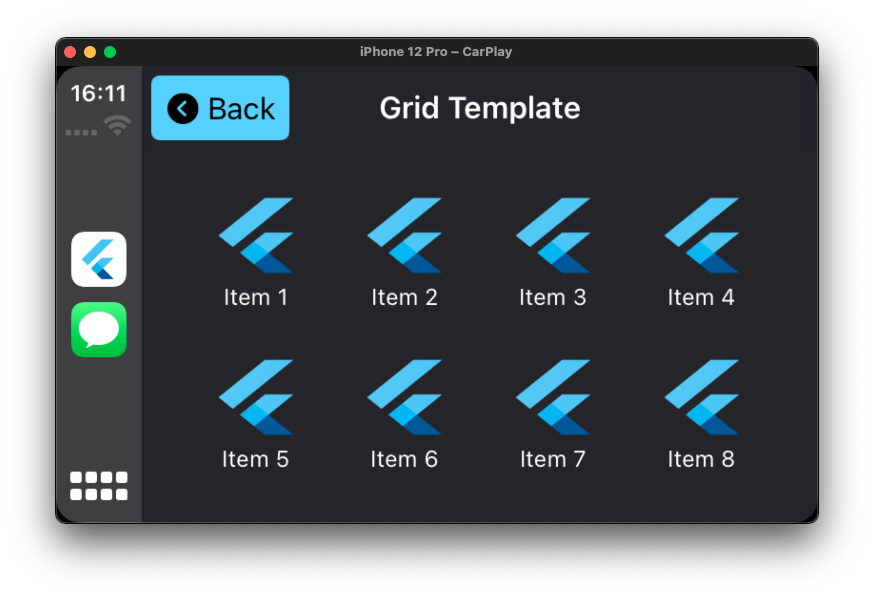
As you can see in the above example, the back button will be visible and pressable. Even, its text and props can be customized. While using the CPGridTemplate, you need to give an image's path from the flutter assets which is you should always import the path of the image into the pubspec.yaml file.
Show an alert to the driver ⚠️
You may need to show an alert or modal to the driver that the app needs its action to continue. In most vehicles, the driver can select one of the actions with the car's buttons on the steering wheel.
FlutterCarplay.showAlert(
  template: CPAlertTemplate(
    titleVariants: ["Alert Title"],
    actions: [
      CPAlertAction(
        title: "Okay",
        style: CPAlertActionStyles.normal,
        onPress: () {
          print("Okay pressed");
          FlutterCarplay.popModal(animated: true);
        },
      ),
      CPAlertAction(
        title: "Cancel",
        style: CPAlertActionStyles.cancel,
        onPress: () {
          print("Cancel pressed");
          FlutterCarplay.popModal(animated: true);
        },
      ),
      CPAlertAction(
        title: "Remove",
        style: CPAlertActionStyles.destructive,
        onPress: () {
          print("Remove pressed");
          FlutterCarplay.popModal(animated: true);
        },
      ),
    ],
  ),
  animated: true,
);
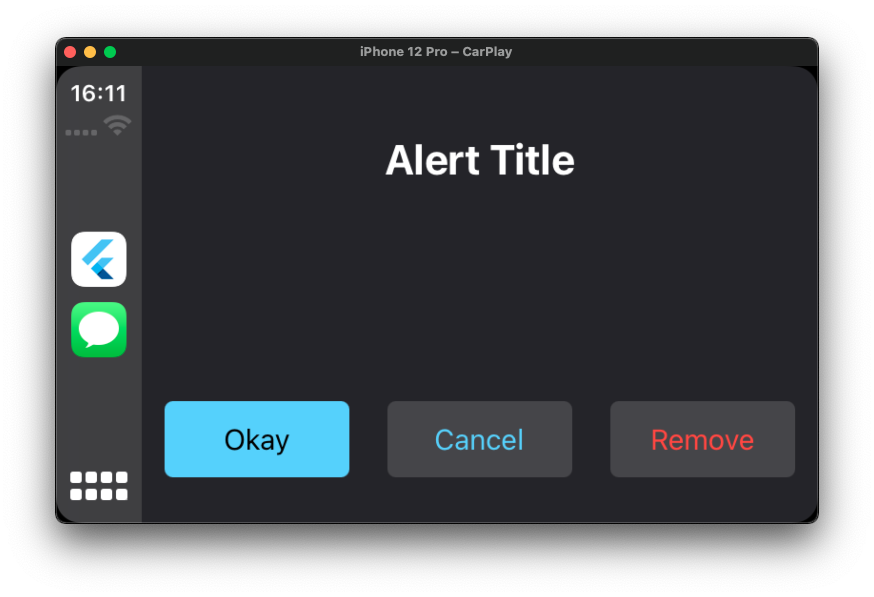
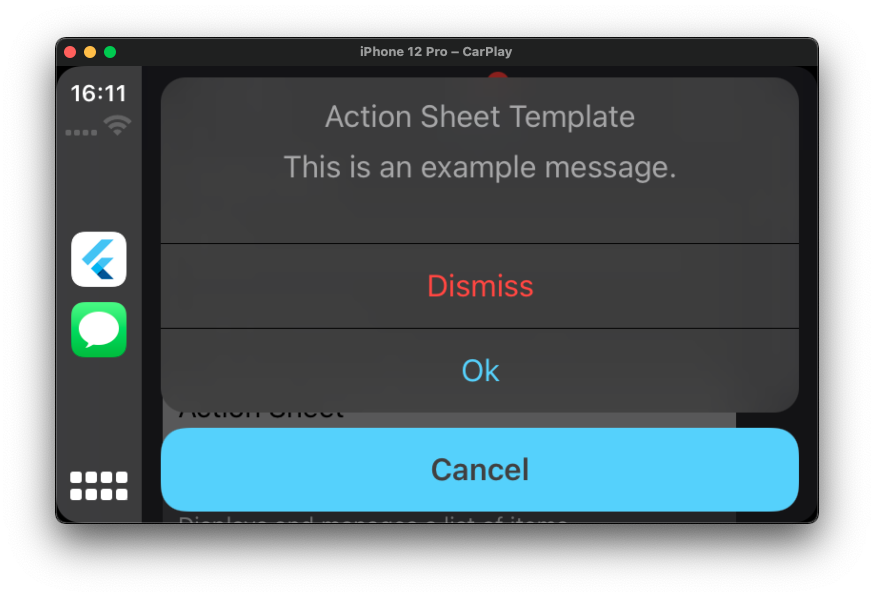
As it is seen, we have shown an alert with FlutterCarplay.showAlert. You can also show an action sheet modal by calling the FlutterCarplay.showActionSheet function. Alert and Action Sheet can not be displayed at the same time, and the only way to remove the both modal is to call FlutterCarplay.popModal.
Handling connection events
You might want to detect connection changes, such as whether CarPlay is connected to the iPhone, running in the background, or completely disconnected, and then suggest actions to the user. It is not needed to use it if you do not want to.
import 'package:flutter/material.dart';
import 'package:flutter_carplay/flutter_carplay.dart';

void main() {
  runApp(const MyApp());
}

class MyApp extends StatefulWidget {
  const MyApp({Key? key}) : super(key: key);

  @override
  State<MyApp> createState() => _MyAppState();
}

class _MyAppState extends State<MyApp> {
  CPConnectionStatusTypes connectionStatus = CPConnectionStatusTypes.unknown;
  final FlutterCarplay _flutterCarplay = FlutterCarplay();

  @override
  void initState() {
    super.initState();
    _flutterCarplay.addListenerOnConnectionChange(onCarplayConnectionChange);
  }

  void onCarplayConnectionChange(CPConnectionStatusTypes status) {
    // Do things when carplay connection status is:
    // - CPConnectionStatusTypes.connected
    // - CPConnectionStatusTypes.background
    // - CPConnectionStatusTypes.disconnected
    // - CPConnectionStatusTypes.unknown
    setState(() {
      connectionStatus = status;
    });
  }

  @override
  void dispose() {
    _flutterCarplay.removeListenerOnConnectionChange();
    super.dispose();
  }

  @override
  Widget build(BuildContext context) {
    return MaterialApp(
      home: Scaffold(
        appBar: AppBar(
          title: const Text('Flutter Carplay'),
        ),
        body: Text(
            'Carplay Status: ' +
                CPEnumUtils.stringFromEnum(connectionStatus),
        ),
      ),
    );
  }
}
We've used the state of the CarPlay connection status class called in the addListenerOnConnectionChange function to ensure when connected to or disconnected from, the CarPlay display. When listening for connection changes, it's highly recommended to call removeListenerOnConnectionChange in dispose, unless it's really necessary for background activities for you. Listening to the change of connection states on a screen that is running in the background or completely removed from the navigation stack, can result in performance issues. If you want to get directly static connection status for a single time, use FlutterCarplay.connectionStatus which is a getter for the current CarPlay connection status to iPhone. It will return one of the CPConnectionStatusTypes as String.
Never forget these:
- the flutter carplay controller must be initialized before the app started. Otherwise, some callback functions will not work and most likely you will get a blank gray or black screen with an error.
- no more than 5 screens (including the root template) must be in the application and should never be pushed more. Otherwise, the carplay app and ios application will crash immediately.
- if you attempt to use a template not supported by your entitlement, an exception will occur at runtime.
- some vehicles limit lists to a maximum of 12 items dynamically. You should always be prepared to manage the situation in which only 12 items can be displayed. Items that exceed the maximum will not be displayed.
Conclusion
Adding CarPlay support to a flutter app was previously impossible due to the issue since Jan 2019. However, the flutter_carplay package solves this problem for you by providing you with a null-safety library to use in your Flutter application with simple integrations and actions. You can find the full complex code example in the flutter_carplay GitHub repository's /example directory. There's definitely a lot more to be done in this package. However, this package makes it possible to integrate CarPlay by solving one of the main problems in Flutter. Now, the rest of the features aren't about Flutter Engine; they're about correctly implementing and detecting the errors. If you are interested in contributing, contributors are always welcome, for more detail please visit here.
After a long time, now Apple CarPlay apps are compatible with Flutter and it's an indescribable feeling that looks forward to seeing Flutter applications in our vehicles, I am also thrilled to be a part of it with my first package in pub.dev.
Thank you for taking the time to read, let's connect!
Thank you for reading my post. That's all for now. Please like it, leave a comment and share this post with interested people, if you find it helpful. Feel free to subscribe to my email newsletter and connect on Twitter(@oguzhanatalay_), LinkedIn(oguzhanatalay), and GitHub(oguzhnatly).
- For more, visit my page - linktr.ee/oguzhanatalay
Support
If you appreciate what I do and want to support me, you can do that by clicking the button below
 or you can simply show your love by staring the repository here.